Installation Guide
Welcome to the Community Forum & News documentation. We have designed this script specifically for Shared Hosting environments (Serveurs Mutualisés) with a focus on automation and ease of use.
1. Server Requirements
Please ensure your server meets the following requirements:
- PHP Version: 8.4 or higher
- Database: MySQL 5.7+ or MariaDB 10.3+
- Web Server: Apache (recommended) or Nginx
- PHP Functions:
symlink()must be enabled (used for automatic storage linking). - Extensions: BCMath, Ctype, Fileinfo, JSON, Mbstring, OpenSSL, PDO, Tokenizer, XML.
2. File Upload & Extraction
The most efficient way to install the script is to upload the compressed file and extract it directly on the server.
-
Prepare: Unzip the main package you downloaded from CodeCanyon. You will see a file named
community2026-script.zipand aDocumentationfolder. -
Upload the Zip: Navigate to your public root folder (usually
public_htmlorwww) and upload thecommunity2026-script.zipfile. You have two options:- Option A (Web Uploader): Use the File Manager of your hosting panel.
- Note: Some shared hosting providers limit web uploads (e.g., max 30MB). If the upload fails or gets stuck, use Option B.
- Option B (FTP): Use an FTP client (like FileZilla). Connect to your server and upload the Zip file inside the public folder. This bypasses web browser limits.
- Option A (Web Uploader): Use the File Manager of your hosting panel.
-
Extract on Server (Crucial Step): Even if you uploaded via FTP, you should use your Hosting Panel to unzip the file (it takes seconds vs hours via FTP).
- Log in to your hosting control panel (cPanel, Plesk, etc.).
- Open the File Manager and find the zip file you just uploaded.
- Right-click on the file and select Extract (or Unzip).
- Once finished, you can delete the zip file.
!!! warning "No Unzipper on your Host?" In the rare case that your hosting panel does not have a built-in unzipping tool:
1.  Unzip `community2026-script.zip` on your computer first.
2.  Use your FTP client to upload all the unzipped folders and files one by one.

*Please note: This method is **much slower** and can take several minutes to an hour depending on your connection, as there are thousands of small files.*
3. Folder Permissions
To allow the automated installer to generate the configuration file (.env) and the dashboard to update SEO files, you must set write permissions (775) on the following:
- /core (Required to generate the
.envfile during installation) - /core/storage (Recursive: apply to all subfolders)
- /core/bootstrap/cache
- sitemap.xml (Located at the root, required for SEO updates)
!!! tip "About Uploads"
You do NOT need to change permissions for /assets or /images. All user uploads are securely stored in /core/storage and linked automatically via a Symbolic Link created by the installer.
4. Run the Automated Installer
- Open your browser and go to your domain:
https://your-domain.com - You will be redirected to the Installation Wizard.
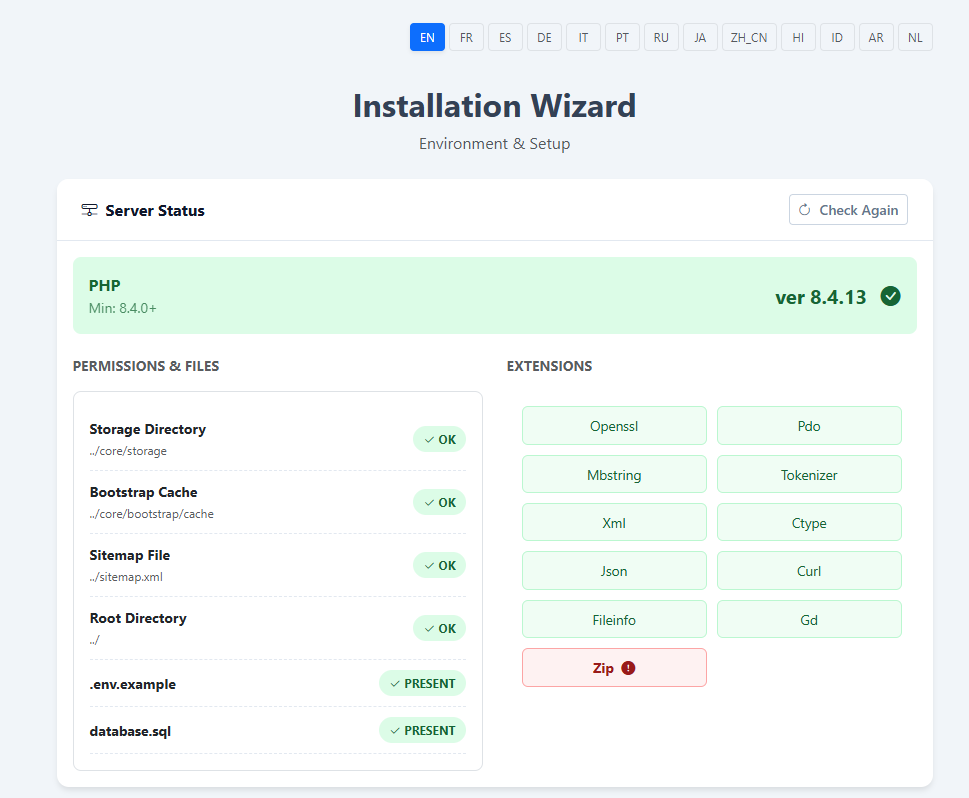
What the installer does automatically:
- Checks Requirements: Verifies PHP version and extensions.
- Database Setup: Imports the SQL structure.
- Environment Creation: Generates the
.envfile inside the/corefolder. - Storage Linking: Automatically performs the PHP
symlinkcommand to link your storage to the public assets. No SSH command required. - Admin Account: Creates a default secure administrator account.
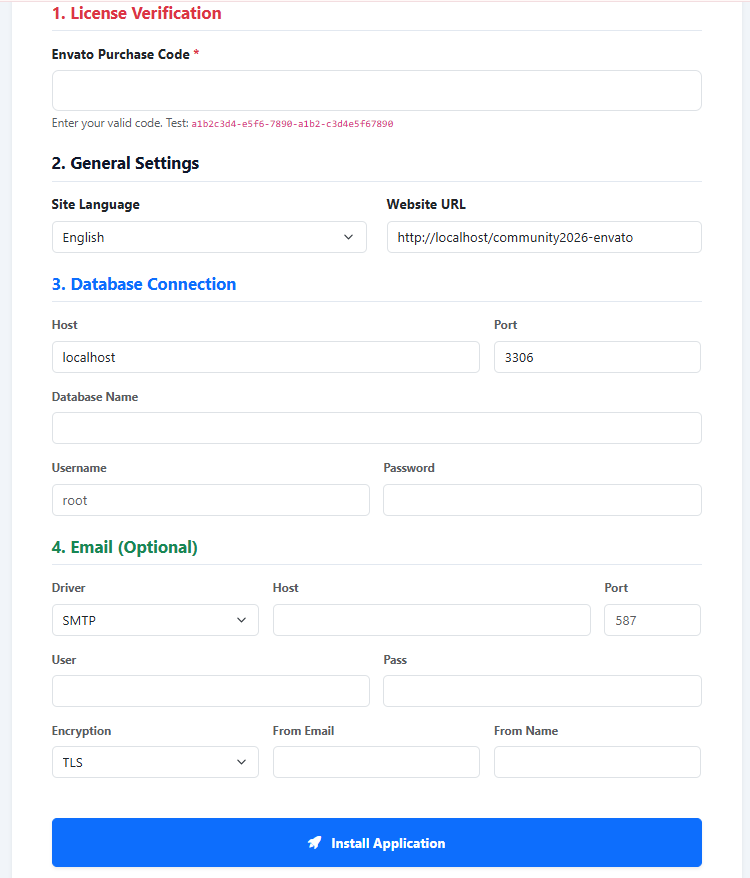
Follow the on-screen steps to enter your Purchase Code and Database credentials.
5. First Login (Default Credentials)
Once the installation is complete, the script creates a default Administrator account that meets our strict security criteria (Uppercase, Lowercase, Number, Special Character).
!!! warning "IMPORTANT: Default Admin Credentials" Use these credentials to log in for the first time:
*   **Email:** `admin@admin.com`
*   **Password:** `AAaa11@@`

**Security Action Required:**
Immediately after logging in, go to your **Dashboard > Profile** to change your email and create a new secure password.
6. Background Tasks (Cron)
Since this script is optimized for Shared Hosting, it uses a "Web Scheduler" by default. This means background tasks (like sending emails) are triggered automatically when users visit your site. You don't need to configure anything on your server immediately.
For advanced users wishing to set up a dedicated Server Cron Job, please refer to the "Administration Guide" section of this documentation.
Troubleshooting
"Symlink" Error during installation
If the installer complains about Symlinks, your hosting provider might have disabled the symlink() PHP function.
* Solution: Contact your hosting support to enable it.
"Permission Denied" when saving settings
Ensure that /core and /core/storage have 775 permissions.
HTTPS not working / "Too many redirects"
If you are using Cloudflare, make sure your SSL/TLS setting in Cloudflare is set to "Full" or "Full (Strict)".